 how-to
DIY Trap Camouflage and Scent Control: A Field Guide
Last Updated: November 7, 2026
Quick Summary
Good trap camouflage hides the trap without changing how it fires: blend the outline, bed the jaws, and match the ground around the pan. Don't pile debris on the pan or bury the springs, and keep any scent treatment off springs and hinges. Match the method to the trap, since foothold, body-grip, and cage traps each fail differently when cover is wrong.
- Reduce human scent at the source first: your body, clothes, and boots, then stop spreading new odor at each set.
- A homemade scent killer mixes 1 part 3% hydrogen peroxide, 1 part baking soda, and 2 parts distilled water.
- For footholds, seat the frame and springs first, then set the trap, and sift cover over jaws and levers only.
- Fresh dirt that differs in color from surrounding ground is the most common reason a well-bedded set gets refused.
- Allow about 30 minutes per set and handle the trap only with gloves to keep odor off the pan.
Table of Contents
- Why Scent and Camouflage Decide Your Trap Line
- How to Minimize Human Scent When Trapping
- Homemade Scent Killer for Hunting and Trapping
- Scent Control Bags for Hunting Clothes and Trap Gear
- Trap Camouflage Techniques That Don't Break the Set
- Step-by-Step Trap Preparation and Placement
- Field Conditions, Troubleshooting, and Refreshing Your Set
- Stock Your Trap Line With Proven Western Lures
- Frequently Asked Questions
Why Scent and Camouflage Decide Your Trap Line
A trap that smells like you will sit empty. Canines and cats read human odor long before they see a set. A clean, well-blended trap fools their eyes; a clean trap with no human smell fools their nose too.
At Campbell Fine Furs, we work closely with the trapping and hunting community. The ones who fill tags treat scent and camouflage as one job.
How to Minimize Human Scent When Trapping
The best way to minimize human scent when trapping is to reduce it at the source: your body, your clothes, and your boots. Then you stop spreading new odor every time you check a set.
Start With Your Body, Not Your Trap
Most beginners spend hours on trap prep and five minutes on themselves. Flip that order.
- Shower with unscented soap before heading out
- Skip scented deodorant, body wash, and cologne on trapping days
- Wash base layers in scent-free detergent and line-dry outside
Rubber boots beat leather, which holds odor in the pores.
Watch out: storing clean gear next to a gas can or in a truck bed full of dog hair undoes a full morning of prep.
For the full routine, our step-by-step guide on how to scent post for coyote trapping walks through the order of operations.
Homemade Scent Killer for Hunting and Trapping
A homemade scent killer for hunting and trapping is a simple mix of hydrogen peroxide, baking soda, and distilled water. It can help reduce surface odor on gear. It does not sterilize a trap or replace clean handling.
The common field recipe:
- 1 part hydrogen peroxide (3% drugstore grade)
- 1 part baking soda
- 2 parts distilled water
Mix in a spray bottle, let it stop fizzing, then spray boots, pack straps, and tool handles. Distilled water matters. Tap water carries its own minerals and smell.
What DIY Recipes Can and Cannot Do
These sprays cut surface odor. They don't fix bad habits.
- They can't remove scent soaked into leather or foam padding
- They can't cover bait smell on your hands
- They won't help if you smoke in the truck
Test any mix on a small patch first. Keep it off trap springs and hinges, where residue attracts grit and causes rust. To compare proven formulations, see our guide on homemade predator lures that work.
Scent Control Bags for Hunting Clothes and Trap Gear
Scent control bags for hunting clothes seal clean gear away from truck fumes, food, and pets. A good bag is one part of a system, not a magic box.
What actually matters:
- Activated carbon lining absorbs odor instead of just blocking it
- A real seal keeps outside air from creeping in
- Separate bags for clean clothes and dirty gear
Pack your base layer, gloves, and hat in one bag. Keep traps, stakes, and tools in a separate tote. Never store bait in either one.
Trap Camouflage Techniques That Don't Break the Set
Good trap camouflage hides the trap without changing how it fires: blend the outline, bed the jaws, and match the ground around the pan. Don't pile debris on the pan or bury the springs.
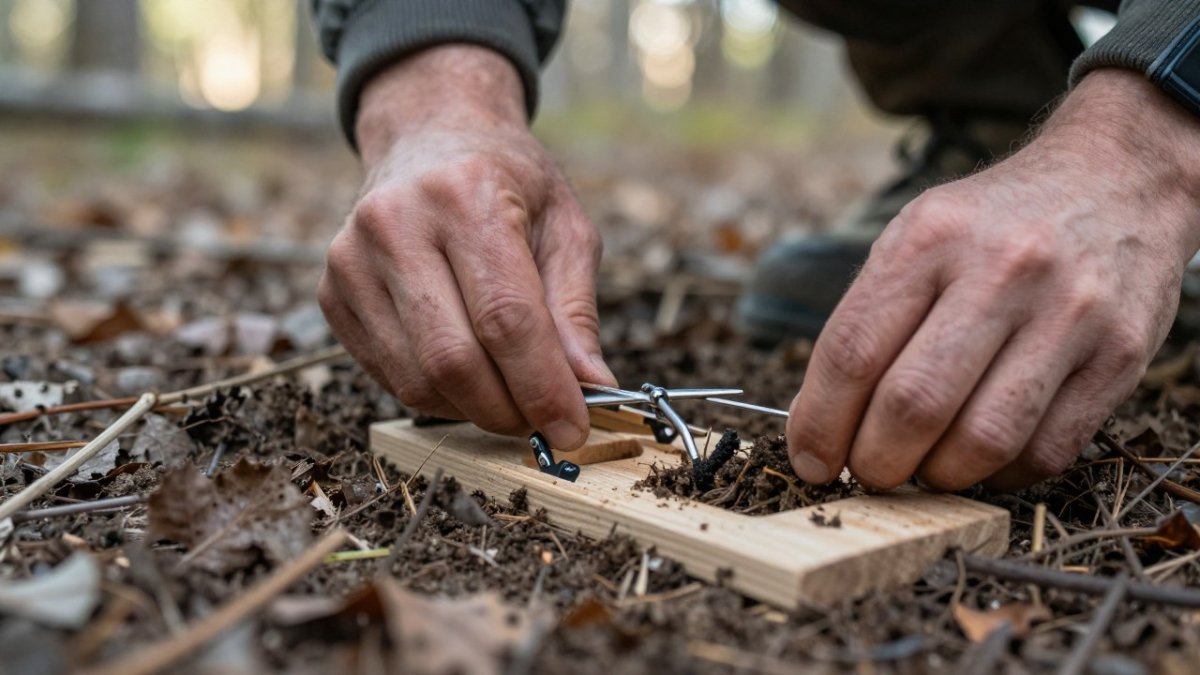
Foothold Traps: Bed the Frame, Free the Pan
A foothold fails when the pan is bridged by debris or the frame rocks in its bed. Work in this order:
- Dig a shallow bed so the trap sits level with the ground and the jaws sit just below the surface
- Seat the frame and springs first, then set the trap
- Sift fine dirt or duff over the jaws and levers, never over the pan
- Blend the edges with leaves, needles, or grass pulled from the same spot
- Press the pan gently to confirm it drops freely and returns before you walk away
A pan cover helps in hardpan, frozen ground, and sandy soil where grit sifts into the works. In leaf litter, use the same leaves rather than fresh soil; dark dirt against pale duff reads as fresh disturbance from ten feet.
Watch out: fresh dirt that is a different color from the surrounding ground is the single most common reason a well-bedded set gets refused.
Body-Grip Traps: Conceal the Trigger, Not the Opening
Body-grip traps are usually set in trails, culverts, or cubbies, and camouflage here means steering the animal into the opening rather than hiding the whole device. Keep the trigger and opening clear. Blend the frame and springs with local debris, and use natural fencing, logs, or brush to narrow the approach so the animal commits instead of skirting it.
Cage Traps: Blend the Box, Protect the Pan
A cage trap is large and reads as a foreign object, so camouflage matters more than with buried sets. Set the cage so the floor sits level and solid; a rocking cage spooks animals and can trip the door early. Cover the top and sides with local vegetation, leaving the entrance open and the interior floor bare.
Match Cover to Ground, Season, and Species
- Hardpan or frozen ground: use a pan cover and a thin layer of sifted dirt; keep the trap shallow and stable
- Leaf litter: blend with the same leaves, not fresh soil
- Grass or pasture: press down a small patch and restore the grass over the set
Late season brings wet, heavy cover and freeze-thaw cycles. Recheck after every thaw and re-blend with material from the same ground; a set that looked perfect in dry conditions can read as a mound after rain.
Keep the Trigger and Jaws Functional
Camouflage that stops the trap from firing is worse than none. Before leaving a set, confirm the pan or trigger moves freely, the jaws close without binding, and the stake or drag holds. Sift cover lightly over the jaws and levers, never over the pan or trigger. Keep any scent treatment off springs and hinges, where residue attracts grit and causes rust.
Step-by-Step Trap Preparation and Placement
Prep and placement decide whether a set produces.
Total time: about 30 minutes per set Difficulty: beginner to intermediate
What you'll need:
- Foothold or body-grip trap, matched to your target
- Sifter or screen for fine dirt
- Pan cover
Step 1: Clean and treat the trap. [Time: 10 minutes] Boil or scrub off old wax, rust, and residue. Let it dry fully, then handle it only with gloves.
Step 2: Prep the site. [Time: 5 minutes] Clear a level bed. Keep the natural cover close by for blending.
Step 4: Camouflage the set. [Time: 5 minutes] Sift cover over the jaws and blend the edges with local material. Leave the pan free.
Step 5: Place and check. [Time: 5 minutes] Set the trap with the wind in your favor, then test the pan and the stake. A set that wobbles will miss.
Watch out: setting a trap with bare hands leaves odor right on the pan, the exact spot an animal noses first.
Before you head out, run through our list of trapping supplies professional hunters actually need so nothing gets left at the truck.
Field Conditions, Troubleshooting, and Refreshing Your Set
Weather breaks sets faster than anything else. Rain packs cover, wind fills pans with debris, and a hard freeze locks springs solid. The trappers who fill tags check, refresh, and re-blend on a schedule instead of waiting for a set to fail.
Read the Conditions Before You Blame the Set
- Rain: packs cover into a crust and can bridge the pan; re-sift with dry material from the same ground and reset the pan cover
- Freeze-thaw: water in the bed expands overnight and lifts the frame; re-bed the trap and keep the pan shallow
- Wind: fills pans and triggers with debris and carries your odor farther; approach from downwind and keep a consistent check route
A common pattern is a set that produces for a week and then goes cold after a storm. Re-blend first, then re-spray your tools, and only then consider moving the set.
Troubleshooting Table
| Problem | Likely Cause | Fix |
|---|---|---|
| Trap won't fire | Debris under pan or frozen spring | Clear the pan, reset with a pan cover |
| Set looks disturbed | Fresh dirt or wrong cover color | Re-blend with local material |
| No visits at all | Human odor or wrong placement | Re-glove, re-spray, move to better sign |
| Missed catches | Trap wobbles or sits too high | Re-bed the frame and level the pan |
| Rust and grit | Residue on springs and hinges | Clean and dry after every check |
| Cage door trips early | Cage rocks or trigger is too sensitive | Level the cage and adjust the trigger |
| Non-target visits | Bait or cover attracts pets and scavengers | Move the set away from trails and cover the bait |
Refresh the Set Without Re-Scenting It
Refreshing a set is where many trappers undo their own work. Handle the trap with gloves, re-sift cover with material from the same ground, and re-spray tools only if you handled them bare-handed.
Watch out: re-spraying a trap with a peroxide mix and then handling it bare-handed puts odor right back on the pan, the exact spot an animal noses first.
Non-Target and Humane Considerations
Scent reduction is not scent elimination, and camouflage is not a substitute for placement. Set traps where non-target wildlife and pets are unlikely to encounter them, check sets on a regular schedule, and follow your state's trapping regulations. A set that attracts a non-target animal is a placement problem, not a camouflage problem, move it rather than adding more cover.
Wind and Approach Discipline
Wind direction matters more than most trappers admit. Approach from downwind, keep your check route consistent so you don't leave a scent trail straight to the pan, and avoid touching vegetation on the approach. A clean trap with a careless approach still smells like a person.
Stock Your Trap Line With Proven Western Lures
Scent discipline gets you to the set. The right lure is what brings an animal in close enough to commit.
Our Western lures are made with Andy Weiser's formulas. For a deeper look at how these scents behave in the field, our field guide to Western hunting lures explains the categories and when to use each. When you're ready to stock up, you can browse the Western lures and baits we carry.
Scent control and camouflage are habits, not products. Build the routine, keep your gear clean, and blend every set like the animal is watching.
Campbell Fine Furs carries Western lures and baits made with Andy Weiser's formulas, plus artisanal fur accessories and home goods for the outdoors-minded.
Frequently Asked Questions
How do you camouflage a trap without interfering with its function?
Bed the trap first, then camouflage around the working parts rather than over them. Keep soil and debris off the pan and out of the jaw channels, and use a light sifting of dry dirt or local leaf litter so the surface matches the surrounding ground. Check that the pan still moves freely and the jaws can close before you walk away. Trap camouflage that jams the mechanism costs you the catch, so test every set by hand after covering it.
Does homemade scent killer for hunting actually work for trapping?
A homemade scent killer can reduce your detectable odor, but it will not eliminate it. A common approach is a mild mix of hydrogen peroxide, baking soda, and distilled water, applied to boots and gear and allowed to dry before heading out. Results vary with wind, temperature, and how scent-conscious the target species is. Treat DIY sprays as one layer of a routine that also includes clean clothing, glove handling, and smart trap placement.
How often should you refresh trap camouflage and scent-control materials?
Check every set after rain, snow, or heavy wind, since those conditions expose trap beds and flatten cover. Refresh camouflage whenever the ground around the trap looks disturbed or the bed no longer blends with its surroundings. Scent-control bags and clothing should be re-treated on the schedule the product gives, and gear should be aired and stored clean between trips. On a working line, a quick inspection every visit prevents small problems from costing catches.
Can scent-control products affect bait or lure?
Yes. Strong-smelling sprays, detergents, and ozone exposure can contaminate bait and lure, which defeats the purpose of using a quality attractant. Keep lures in sealed containers, handle them with clean gloves, and never store them in the same bag as treated clothing or scent-control gear. Apply DIY sprays to boots and outer layers well before you handle lure, and let everything dry completely so residue does not transfer to your set.